Blender

3405 readers
2 users here now

A community for users of the awesome, open source, free, animation, modeling, procedural generating, sculpting, texturing, compositing, and rendering software; Blender.

Rules:

  1. Be nice
  2. Constructive Criticism only
  3. If a render is photo realistic, please provide a wireframe or clay render

founded 2 years ago
MODERATORS
1
10
Offset Sharp Edges (programming.dev)
submitted 3 days ago* (last edited 3 days ago) by Statick@programming.dev to c/blender@lemmy.world


Disclaimer, I am a novice/hobbyist. Only use blender for 3D printing purposes.

TLDR; Add-ons Mesh Tools -> Offset Edges and Curve Tools -> Recursive Offset can achieve offsetting similar to a CAD program like Fusion 360. Watch this video (not mine) for a more comprehensive guide on Curve Tools https://youtu.be/HSUpmhGdgGQ?t=191

Full Explanation

I ran into an issue recently where I needed to offset an edge, similar to what a program like Fusion 360 can do with a sketch. After some searching, I found that there is an add-on built in that can be enabled called "Mesh Tools" that can do this pretty easily.

Mesh Tools approach (Didn't work for my specific issue)

On Blender 5.0...

  • Edit -> Preferences -> Get Extensions
  • Search "Mesh Tools"
  • Click "Install"

Then, in edit mode:

  • Select edge you want to offset
  • Right-click -> Mesh Tools -> Offset Edge

There are a few different options and this works fairly well. I used the Extrude option

My issue was I had a sharp edge and it was causing intersecting edges/faces

I made a post on Reddit asking what the best way to solve it was and never got a reply, and then I realized I never checked if there was a Blender community on lemmy.

Curve Tools approach

Anyway, I found a solution to my specific problem, "Curve Tools" in this video: https://youtu.be/HSUpmhGdgGQ?t=191

Caveats before starting:

  • The object/edge needs to be planar and on the XY plane.
  • This will ruin the topology and I'm not the guy to tell you how to fix it.

On Blender 5.0...

  • Edit -> Preferences -> Get Extensions
  • Search "Curve Tools"
  • Click "Install"

Then, in edit mode:

  • Select the edge you want to offset
  • E to Extrude
  • Esc to leave it in place
  • P to separate by selected
  • Go back to object mode, and select the object you just separated
  • Object -> Convert -> Curve
  • Go back into edit mode, select everything
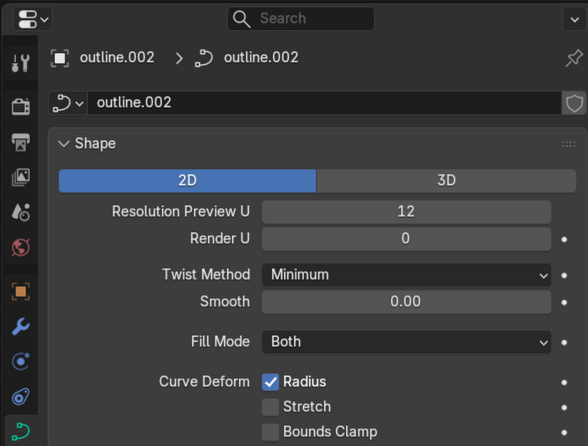
  • Make the curve 2D and set Fill Mode to Both. (Under the Data tab in the Properties section)

  • Press N to show the context menu if it's not already displayed on the right side.
  • Edit -> Recursive Offset
  • Set the offset to the desired amount

After this you can convert that object back into a Mesh object and use it how you want.

I have no idea if this is the best solution, maybe there is a plugin that does this without converting to a Curve, but I wanted to share what I found here.

2


If you‘re interested, here‘s my portfolio on blenderartists: https://blenderartists.org/u/nautilux/activity/portfolio

3


Over 800 objects have one UV map called “UVMap”. Visible in the Object Data Properties under “UV Maps”.

I now want to add one new UV map to all these 800 objects. What I tried and what I found via Google sounds logical, but it doesn't work in Blender 5.0.0. Maybe a bug?

When you select multiple objects and then click on the + at the side of the UV Maps list, a “UVMap.001” appears. But it just gets added to one of the objects, not all of them. Even if you alt-click the + sign.

According to Google search results, this should have worked.

The next step would be to make UVMap.001 the active one for all selected objects.

Update: I gave up and used a script.

4


I needed some faint reflection of nearby fireworks and found this video very helpful.

For other projects, it's at least a quick starting point.

5
6


One room of my "Grandpa's Flat" series

7


I made this with Blender 4.5

8


Hello Blender community!

I'm returning to Blender after a few years away and feel like a total beginner again. This hit home when I watched some of my old animations; I was simultaneously amazed I ever made them, and horrified that I now struggle to remember how to model a decent cube!

What are your top tips for a returning beginner? I'm especially curious about:

  • Must-change settings or preferences?

  • Best free add-ons to install day one?

  • Your favorite short YouTube tutorials for getting back up to speed?

For what it's worth, I stopped around early 2023/24. Geometry Nodes were out, but they kept changing how the nodes worked, which confused my simple brain beyond belief. It seems they're more stable now, so any fun projects you know of or advice on picking them up would also be hugely appreciated!

Any helpful advice is greatly appreciated!

9


After watching This Cody Gindy video (https://www.youtube.com/watch?v=s8N00rjil_4&t=268s) I knew I had to use the effect on my characters. Problem is, after hours of hand painting an object space normal map, I learned the lighting doesn't work right on a rigged character and it needs to be in tangent space (the issue can be seen on the character's arm) I don't think I can handpaint it in tangent space. Is there a way to convert it? and will it keep it's painterly effect?

10
11


I was asked to create a poster for an event of a hobby group I am a part of; This image formed the base of the poster. That's why there's a larger unused area in the sky, to make place for headings and texts. Nonetheless, I am generally very happy with the image even outside of its use as a poster.

I am particularly content with the clouds; those are a relatively simple procedural shader, but Eevee's improved volumetric rendering made working with it a joy.

Otherwise, the image is rather blatantly based on Idylls of the King, a work by Gustave Doré which has been used for album covers on multiple occasions. What can I say, it's just a really nice illustration.

12


I am considering to build a desktop pc for 3d modelling and some rendering, mostly still images. Not interested in AI/crypto stuff, where apparetly most progress is focused. How should I think about it? Does it still make sense to avoid Nvidia? Maybe even second-hanf market is worth attention now?

13
14


Shoutout to the 19 upvoters who saw my previous progress posts! Refer to my previous post for the full writeup on how it works. Feedback welcome for development -- rock on, noders! 🤘

15
16
17


Made with Blender. Source files and extras available at https://studio.blender.org/projects/impulse-purchase/

18


Operating System: Bazzite (Linux)

GPU: Intel Arc A770

Tried with both Flatpak Blender 3D and from Blender.org directly. Same result.

works in Blender 4.2.10 LTS, except for Embree.

19
20


My work on Project Mata Nui Rising (where I contribute as an environmental artist) inspired me to also make this. I'll be making a few more cool renders with this guy, (hopefully collabing with someone who can do way better box-art). For this render I chose to copy the original set's box-art (To make the background I took the original image and crudely blotted-out the LEGO set).

21


cross-posted from: https://sopuli.xyz/post/32396747

modeled by me in blender

Rendered in evee with different lighting conditions, sun turned off: birdhouse at night

sun turned on

22


Wow, it's been a while...but I'm still alive! More exciting still, is that I've been able to chip away at a decent amount of items off my checklist. Enough to give an update on...

Guitar Nodes v0.8(ish)!

So what and why even?

  • GuitarNodes fits in the middle of a Venn diagram, between (Blender v4+) animators and guitar enthusiasts
  • Simply put, it's a tool that aims to make it easier to create, customize, and animate a guitar, while minimizing time spent on all of the steps that come between the joy of a sweet guitar model and the pain of setting it up for (passably) realistic animation
  • Once I clean up any orphaned data, I will release this version and all subsequent versions for free!

Features

Body

  • Menu switch between guitar bodies in a modular fashion [1]
  • Transform with gizmos [1] [2] [3]

Headstock

  • Menu switchable [1]

Tuning Pegs

  • Menu switchable [1]
  • Projects tuning pegs onto headstock based on aligning guide geometry [2] [3]
  • Creates simple string-ends that connect from each peg to the nut [4] [5]

Neck

  • Creates a mesh that bridges 3 profile curves [1]
    • Nut profile curve
    • 12th fret profile curve
    • End of fretboard profile curve

Frets

  • Currently uses a stand-in mesh, but I'll throw a menu switch in if there's a demand for custom fret bars
  • Adjustable fret count
  • The frets use a luthier's math formula to calculate their distance based on the length of the guitar string scale [1] [2]

Strings

  • Adjustable string count, spread, and action [1]
  • Menu switch to choose between gauges (currently only 6- and 7-string gauges have been implemented)
  • Strings vibrate according to note frequency (or whatever you want if you get in the nodes and change it manually)
  • This is currently also manually listed similar to string gauges
    • I will rework this when I can get it to interact with MIDI files
  • Strings stop vibrating based on chosen fretted notes
  • Notes can be bent
  • String gauges flip if "Lefty" boolean is checked
  • _Player_Controls nodegroup has values for each string
    • Fret number being played [2]
    • Bend amount [3] [4]
    • String oscillation axes (X and Y), with sliders to determine how much in each direction [5]
    • String depression depth, to mimic being depressed by a finger when fretted [6]
    • Flip direction of the strum
    • Each string has its own adjustable oscillation strength ("Osc Height")

Saddle

  • Could easily add a menu switch for the geometry if you want to go modular
  • Automatically fits at the end of the string (based on scale length) [1]
  • Has a dial gizmo to rotate the saddle (Z-axis) in place [2]

Bridge

  • Could easily add a menu switch for the geometry if you want to go modular
  • Samples the guitar body to place in alignment with the Saddle
  • Distance from bridge can be adjusted with a linear gizmo [1]
  • Connects end strings (saddle to bridge)
    • Strings have adjustable Z-height with linear gizmo [2]

Pick Guard

  • Could easily add a menu switch for the geometry if you want to go modular
  • Follows the X-/Y-axis placement of a Guide Empty [1]
  • Samples the guitar body to place with Z-up facing the body's normal direction
  • Rotate and translate in Z with gizmos [2]
  • Can be toggled on/off with boolean switch

Tone Knobs

  • Could easily add a menu switch for the geometry if you want to go modular
  • Instances knobs based on raycast from a Guide Curve [1]
  • Resolution determines number of knobs
  • Extrude guide curve in X/Y direction to change direction of knob layout [2]
  • Can be toggled on/off with boolean switch

Output Jack

  • Could easily add a menu switch for the geometry if you want to go modular
  • Samples the guitar body to position based on location
  • Follows the X-/Y-axis placement of a Guide Empty [1]
  • Can be rotated with dial gizmo [2]
  • Can be toggled on/off with boolean switch

UI

  • Shows scale and fretboard length (toggle with boolean)
    • Follows the string (scale) and fretboard geometries respectively
  • Shows fretboard chart (toggle with boolean) [1]
    • Shows frets currently selected on each string (integers on _Player_Controls nodegroup) with a red dot
    • Shows the fret by number for where dots are traditionally inlaid on a guitar fretboard (i.e. 3, 5, 7, 9, 12, repeat per octave)
    • Fretboard expands and shrinks to fit all of the fret dots
      • The amount of geometry culled is adjustable
    • Adjustable UI fretboard line thickness
    • Is adjustable with a transform gizmo [2]

Future Plans

Nearer

  • Add per-fret string translation that slightly increases string frequency for bending
  • I need help (still!) getting the points which the Tone Knobs instance at: they currently do not rotate to point the Z in the normal direction of the body. Instead, they all seem to match the first point's Z direction only. I want each point to recognize the normal of the nearest faces it's stuck to
  • A strings-only version, for people that want to use their own guitar models

Further out

  • Custom guitar body, drawn with grease pencil (shoutout to Joey C for the inspiration!)
  • Simulation nodes for strings, so that you can have oscillation decay over time
  • Simulation nodes that interact with a plectrum object, so they can be literally strummed (probably gonna need a bit of help, too!)
  • Better procedural materials
    • Is it possible to use a For Each Element zone to change string material based on its position/diameter (i.e. thicker strings are wound material)
    • How much of this requires knowledge of handling UVs through geo nodes?
  • Simulation nodes for painting custom materials on guitar
  • Possible driver UI that changes a lot of these values, so that you don't have to go into the nodes to change things
  • Want to implement a tablature-style tracker
    • Automatically keys the string fret values to match the song's rhythm, accounting for framerate
  • Pickups & Selector Switch
  • Whammy Bar?!
  • Any other feedback that I like enough to implement myself
23


I've worked a bit with the Blender VR extension in Blender 4.5 (and previous versions). It is great. It's limited, but it works. Steam VR + ALVR can allow Blender to connect to VR headsets like Meta (Oculus) Quest 2 and others, and it makes for a very convenient workflow to check out a scene in real "physical" dimensions. In other workds, I can move around inside the scene and look at details in a completely different way from how I do it using a flat screen.

But there are some limitations.

It only works with movement and the VR controllers. It doesn't somehow work with USB gamepads. And it doesn't work with hand tracking.

I wish there was more work put down into it. Here's the scenario I'd like:

For me, I would like to use the keyboard navigation that is there on the flat screen version. I just wanna use the keyboard to move around, as I don't wanna move into another room or a larger space to move around physically - I just wanna check out my scene as I model.

Also, there seems to be some stability issues - especially using ALVR, as it keeps disconnecting. Probably not related to Blender VR.

Anyway, the recent partnership with Pico is interesting and give me hope! Go Blender!

24


Does anyone remember the Blender Gingerbread starter tutorial? I feel so old...

25
view more: next ›